 Git
Git
No matter how experienced you are, Git will always find a way to surprise you. It is loaded with neat tricks that have the power to make your daily coding routine much smoother.
In this article, you’ll find 5 extra tips that will help you bring your Git skills to the next level (in case you missed it, take a look at our previous post, Top 5 Git Tips & Tricks ).
Visualise in the command line
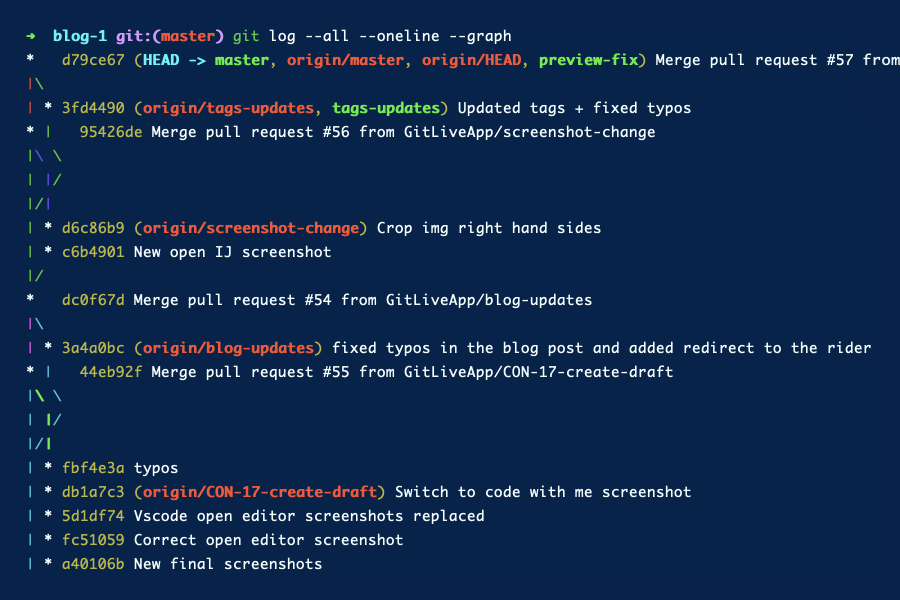
You have cloned a repository and to understand it better, you’d like to look at the commit history. Wouldn’t it be nice to get a visual representation of all that has happened?
$ git log --all --oneline --graph
If you need to visualise the Git history, git log --graph can be more helpful than a simple git log. By default, git log displays full commit hash, author, date and message, each on a new line, which sometimes makes it difficult to get a clear understanding of what has happened. There are many ways to customise it, but if you just want to have a compact overview of your commit history you should try the command above.
--all # will include commits from all branches
--oneline # will show information on one line
--graph # will draw a text-based graphical representation of the commit history
Take a peek at a file of another branch
You are working on a branch feature-one and you want to take a quick look at a file that lives in feature-two branch. Wouldn’t it be cool to do it without actually switching branch?
$ git show <branch_name>:<file_name>
With this command you can view the content of a file from another branch. After running it you will be able to view the content of the chosen file in your terminal.
💡 You can also view changes from other branches and even your teammates' uncommitted code, directly in GitLive and, if you need to, cherry pick them to apply those changes to your local files.
Find out who's to blame
Some changes were made to the file you’ve been working on and you are not entirely sure why they are there, ideally you would like to ask for help from the person who made the changes.
$ git blame <FILE_NAME>
You can use this command to see who changed what in a specific file, line by line.
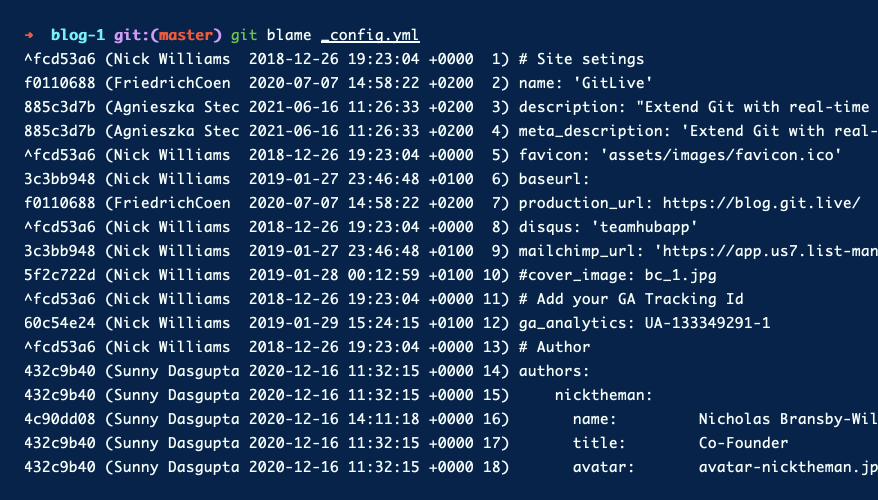
Depending on what you want to show, you can pass different flags. In case you want to check the specific part of the file you would use $ git blame -L <range> which restricts the output to the selected line range.
Other useful flags:
$ git blame -w # ignores white space modifications
$ git blame -M # ignores moving and copying text within the same file and shows the original author instead
$ git blame -C # ignores moving and copying text into other files and shows the original author instead
Text search through time
Your code editor most likely allows you to easily search for text in your project, but often it comes in handy to search through previous revisions of the files as well.
$ git grep STRING $(git rev-list --all)
Git Grep is a command that allows you to quickly search through your tracked files for a given string or regex. By default it will ignore untracked files, but you can add --untracked flag to the command to search through untracked files.
Let’s take a look at some useful flags:
$ git grep STRING # searches through the files in your working directory (current state)
$ git grep STRING $(git rev-list --all) # searches through all the commits (entire history of the project)
$ git grep STRING HEAD~1 # search only in the commit prior to the current head
$ git grep STRING <commit1> <commit2> <commit3> # search only in the specific commits (list as many commits as you need)
$ git grep -ni STRING # Case insensitive search. Will list the matches along with line numbers
$ git grep -c STRING # Shows the number of lines that match, instead of listing all the results
$ git grep STRING *.js # search only the files with the specific extension (ignore matches from other files)
Teamwork is key: credit a co-author of a commit
The feature you’ve been working on was really tough, and you know you could not have done it without Anna’s help. Her contribution was invaluable and it’s only fair to give her credit for that.
Co-authored-by NAME <email>

$ git commit -m "Prepare release.
>
>
Co-authored-by: name1 <name1@example.com>
Co-authored-by: name2 <name2@example.com>"
This easy way of supporting multiple authors was introduced by GitHub in order to improve collaboration within the team and promote social coding. This syntax is supported by GitHub and GitLab and it’s a great way to credit both developers who worked on a commit.
To add one or more co-authors to the commit, you need to know their name and email (if they decide to keep their email private you should ask them for their GitHub provided no-reply email address instead which can be found on the email settings page in GitHub). You add them to the message (each on a new line) before the closing quotation mark.
If you follow this syntax, you will see the co-authored commit on GitHub (it happens also if you select the Squash and merge option on a pull request). It can also be included in the profile contributions graph and the repository’s statistics.

Thanks for reading! Hope you enjoyed our selection of 5 Git Tips to Level Up Your Workflow. If you liked it, you might also want to check our article on Top 5 Git Tips & Tricks. Feel free to share your favorite hacks in the comments. Happy Git-ing!


Comments